GDPR Management with CEF Context Broker
![]()


![]()
![]()
This tutorial uses the FIWARE Wilma PEP Proxy combined with FIWARE Keyrock to secure access to FIWARE Orion-LD endpoints exposed by FIWARE generic enablers. Users (or other actors) must log-in and use a token to gain access to the services.
Contents
Details
- Securing Microservices with an Identity Management and a PEP Proxy
- Prerequisites
- Architecture
- Users management
- Grouping User Accounts under Organizations
- Managing Roles and Permissions
- PEP Proxy
- Authorizing Application Access
-
Securing CEF Context Broker
- Access to CEF Context Broker without Access Token
- How to obtain Access Token
- Access CEF Context Broker with an Authorization token: Alice user
- Access CEF Context Broker with an Authorization token: Managers (e.g. Bob)
- Access CEF Context Broker with an Authorization token: Users (e.g. Charlie)
- Access CEF Context Broker with an Authorization token: Data owners (e.g. Ole)
- Access CEF Context Broker with an Authorization token: Other users (e.g. Eve)
- Integration with eIDAS
Securing Microservices with an Identity Management and a PEP Proxy
Introduction to the solution
This tutorial secures access to a FIWARE application using the entities and Personal Data that have been created using the corresponding import-data script. Additionally, the creation of the corresponding users and configuration of the permissions, roles, and the relation between them into the corresponding user-organizations and application-management scripts.
In order to secure access to application resources, it is necessary to know two things. Firstly, who is making the request and secondly is the requestor permitted to access the resource? The FIWARE Keyrock generic enabler uses OAuth2 to enable third-party applications to obtain limited access to services. OAuth2 is the open standard for access delegation to grant access rights. It allows notifying a resource provider (e.g. the CEF Context Broker) that the resource owner (e.g. you) grants permission to a third-party (e.g. a Personal Data Management System) access to their information (e.g. the list of entities).
There are several common OAuth 2.0 grant flows, the details of which can be found below: - Authorization Code - Implicit - Password - Client Credentials - Device Code - Refresh Token
The primary concept is that both Users and Applications must first identify themselves using a standard OAuth2 Challenge-Response mechanism. Thereafter, a user is assigned a token which they append to every subsequent request. This token identifies the user, the application and the rights the user is able to exercise. FIWARE Keyrock can then be used with other services can be used to limit and lock-down access. The details of the access flows are discussed below. FIWARE Wilma can be used to check the incoming requests to CEF Context Broker to provide authentication and authorization.
The reasoning behind OAuth2 is that you never need to expose your own username and password to a third party to give them full access - you merely permit the relevant access which can be either Read-Only or Read-Write and such access can be defined down to a granular level. Furthermore, there is provision for revoking access at any time, leaving the resource owner in control of who can access what.
Once the application is able to authenticate users, it is also possible to lock down access using access control
mechanisms. Access control requires having an access policy - in other words defining who can do what. We have
already defined roles and permissions in the corresponding user-organizations and application-management scripts.
The present document demonstrates that is possible to Permit or Deny access to resources based on an authenticated
user identifying themselves within an application. It is a matter of the code following a different line of
execution if the access_token was not found (Level 1 - Authentication Access), or confirming that a given
access_token had appropriate rights (Level 2 - Basic Authorization).
A PEP Proxy lies in front of a secured resource and is an endpoint found at "well-known" public location. It serves as a gatekeeper for resource access. Users or other actors must supply information to the PEP Proxy to allow their request to succeed and pass through the PEP proxy. The PEP proxy then passes the request on to the real location of the secured resource itself - the actual location of the secured resource is unknown to the outside user - it could be held in a private network behind the PEP proxy or found on a different machine altogether.
FIWARE Wilma is a simple implementation of a PEP proxy designed to work with the FIWARE Keyrock Generic Enabler. Whenever a user tries to gain access to the resource behind the PEP proxy, the PEP will describe the user's attributes to the Policy Decision Point (PDP), request a security decision, and enforce the decision. (Permit or Deny). There is minimal disruption of access for authorized users - the response received is the same as if they had accessed the secured service directly. Unauthorized users are answered with a 401 - Unauthorized response.
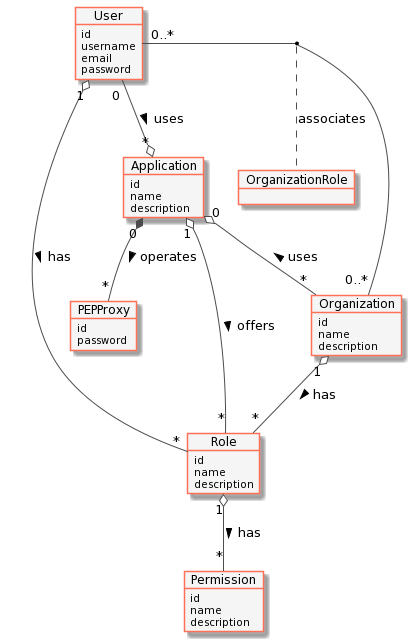
Standard Concepts of Identity Management
The following common objects are found with the FIWARE Keyrock - Identity Management database:
- User, any signed-up user able to identify themselves with an eMail and password. Users can be assigned rights individually or as a group.
- Application, any securable FIWARE application consisting of a series of microservices.
- Organization, a group of users who can be assigned a series of rights. Altering the rights of the organization effects the access of all users of that organization.
- OrganizationRole, users can either be members or admins of an organization - Admins are able to add and remove users from their organization, members merely gain the roles and permissions of an organization. This allows each organization to be responsible for their members and removes the need for a super-admin to administer all rights.
- Role, a role is a descriptive bucket for a set of permissions. A role can be assigned to either a single user or an organization. A signed-in user gains all the permissions from their own roles plus the roles associated to their organization.
- Permission, an ability to do something on a resource within the system.
Additionally, two further non-human application objects can be secured within a FIWARE application:
- IoTAgent, a proxy between IoT Sensors and the Context Broker.
The relationship between the objects can be seen below - the entities marked in red are used directly within this tutorial:
Video: Introduction to Keyrock
Click on the image above to watch an introductory video.
![]()
Video: Introduction to Wilma PEP Proxy
Click on the image above to see an introductory video.
![]()
Prerequisites
Docker and Docker Compose
Docker is an open platform for developing, shipping, and running applications.
Docker Compose is a tool for defining and running multi-container Docker applications. To keep things simple
both components will be run using Docker. Docker is a container technology which
allows to different components isolated into their respective environments.
- To install Docker on Windows follow the instructions here
- To install Docker on Mac follow the instructions here
- To install Docker on Linux follow the instructions here
A YAML file is used configure the required services for the application. This means all container services can be brought up in a single command. Docker Compose is installed by default as part of Docker for Windows and Docker for Mac, however Linux users will need to follow the instructions found here
You can check your current Docker and Docker Compose versions using the following commands:
docker-compose -v
docker version
Please ensure that you are using Docker version 18.03 or higher and Docker Compose 1.21 or higher and upgrade if necessary.
Cygwin for Windows
Cygwin is a Linux-like environment for Microsoft Windows. We will start
up our services using a simple bash script. Windows users should download Cygwin
to provide a command-line functionality similar to a Linux distribution on Windows.
Postman
 Postman is a collaboration platform for API development. Postman's features simplify each step of building an API and
streamline collaboration, therefore you can create better APIs—faster. To install Postman, follow the instructions
here.
Postman is a collaboration platform for API development. Postman's features simplify each step of building an API and
streamline collaboration, therefore you can create better APIs—faster. To install Postman, follow the instructions
here.
http
 http is a command line HTTP client, similar to curl or wget, with JSON support, syntax highlighting, persistent
sessions, and wget-like downloads with an expressive and intuitive syntax.
http is a command line HTTP client, similar to curl or wget, with JSON support, syntax highlighting, persistent
sessions, and wget-like downloads with an expressive and intuitive syntax. http can be installed on each
operating system. Follow the instructions described here.
jq
 jq is a program to slice, filter and map the content of JSON data. This is a useful tool to extract certain
information automatically from the HTTP responses.
jq is a program to slice, filter and map the content of JSON data. This is a useful tool to extract certain
information automatically from the HTTP responses. jq is written in C with no dependencies and can be use
on nearly any platform. Prebuilt binaries are available for Linux, OS X and Windows. For more details how to install
the tool you can go here.
Architecture
This application protects access to the Personal Data by adding PEP Proxy instance in front of the CEF Context Broker
and uses data created by the scripts (import-data, users-organizations, and application-management). It will
make use of three FIWARE components - the Orion-LD Context Broker, the
Keyrock - Identity Management, and one instances
Wilma - PEP Proxy.
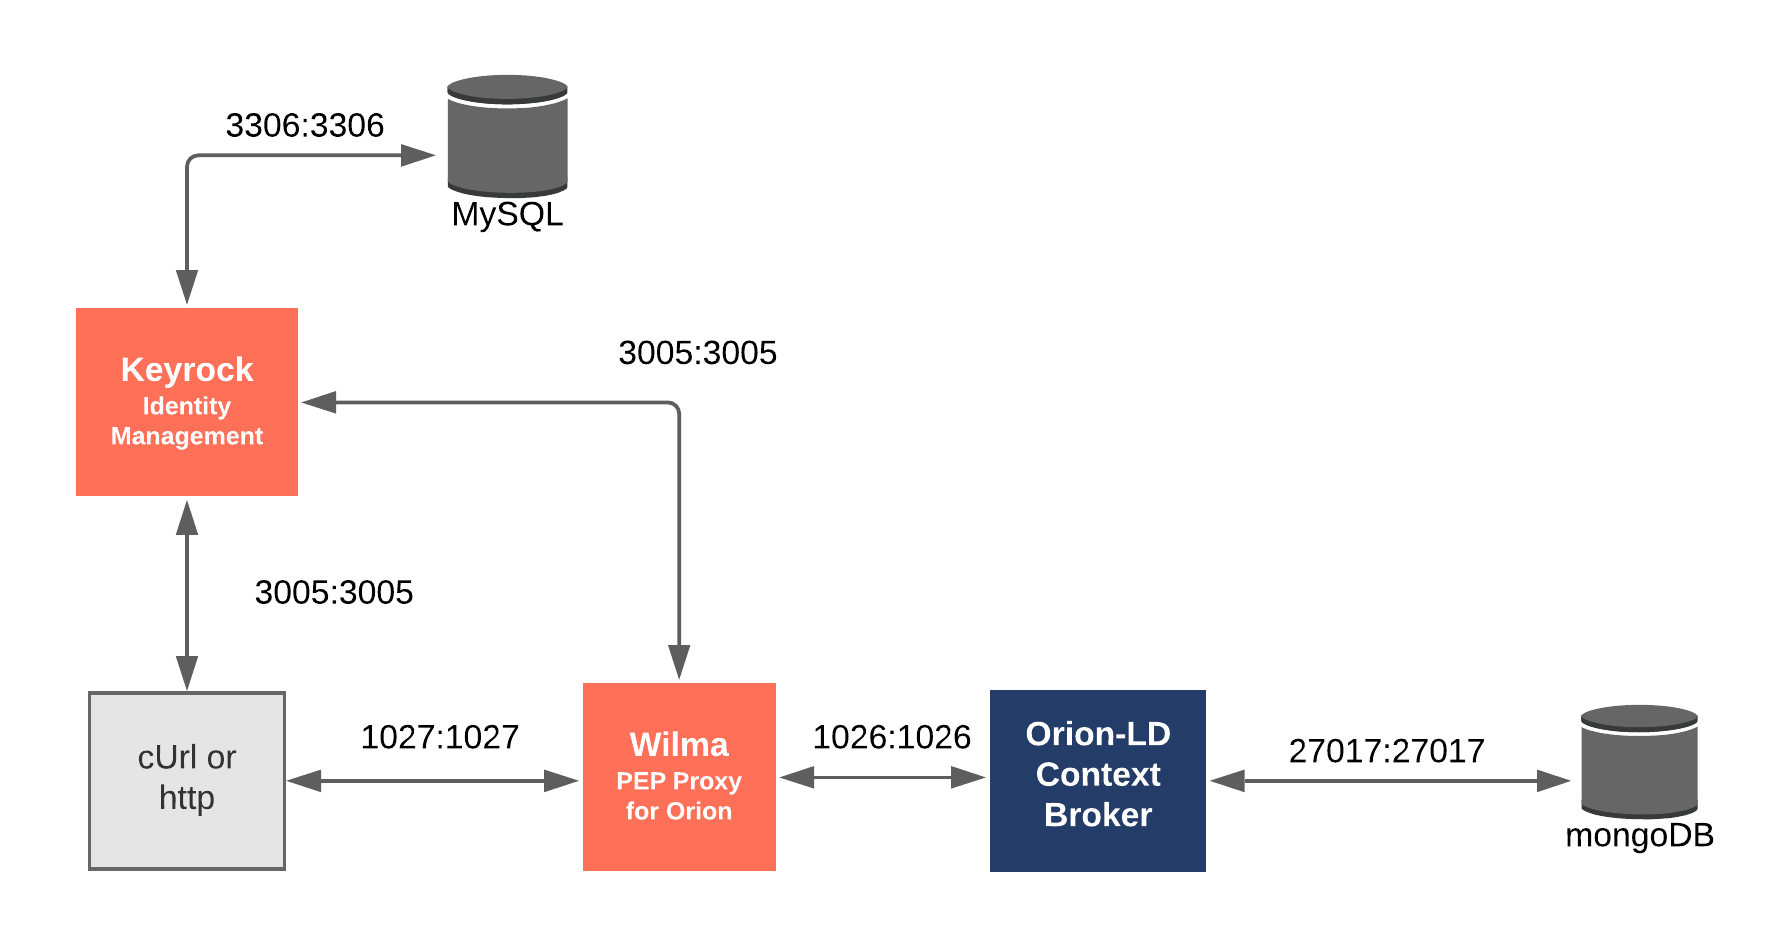
The CEF Context Broker rely on open source MongoDB technology to keep persistence of the information they hold. Keyrock uses its own MySQL database. The architecture consists of the following elements:
- The FIWARE Orion Context Broker which will receive requests using NGSI-LD.
- FIWARE Keyrock offer a complement Identity Management System including:
- An OAuth2 authentication system for Applications and Users.
- A site graphical frontend for Identity Management Administration.
- A REST API for Identity Management via HTTP requests.
- FIWARE Wilma is a PEP Proxy securing access to the Orion microservice.
- The underlying MongoDB database:
- Used by the CEF Context Broker to hold context data information such as data entities, subscriptions and registrations.
- Used by the IoT Agent to hold device information such as device URLs and Keys.
- A MySQL database:
- Used to persist user identities, applications, roles and permissions.
Since all interactions between the elements are initiated by HTTP requests, the entities can be containerized and run from exposed ports.
The specific architecture of each section of the tutorial is discussed below.
Start Up
To start the installation, do the following:
git clone https://github.com/flopezag/tutorials.secured-OrionLD.git
cd tutorials.secured-OrionLD

./services create
Note The initial creation of Docker images can take up to three minutes
Thereafter, all services can be initialized from the command-line by running the services Bash script provided within the repository:
./services <command>
Where <command> will be help, start, stop or create.
:information_source: Note: If you want to clean up and start over again you can do so with the following command:
console
./services stop
Dramatis Personae
The following people at test.com legitimately have accounts within the Application
- Alice, she will be the Administrator of the Identity Management Application. The account is created in the initialization process of the Identity Management.
- Bob, administrator of the application, he has access to read and write the Personal Data store in the application.
- Charlie, he is an application's user. He needs to read the Personal Data of the users but cannot modify them.
The following people at example.com have signed up for accounts, but have no reason to be granted access
to the data
- Eve - Eve the Eavesdropper.
- Mallory - Mallory the malicious attacker.
The following people at xyz.foo have signed up for accounts and can access to their Personal Data for reading
and writing only:
- Ole.
- Torsten.
- Frank.
- Lothar.
For more details (Click to expand)
| Name | Password | |
|---|---|---|
| Alice | alice-the-admin@test.com |
test |
| Bob | bob-the-appmanager@test.com |
test |
| Charlie | charlie-the-appuser@test.com |
test |
| Name | Password | |
|---|---|---|
| Eve | eve@example.com |
test |
| Mallory | mallory@example.com |
test |
| Name | Password | |
|---|---|---|
| Ole | ole-lahm@xyz.foo |
test |
| Torsten | torsten-kuehl@xyz.foo |
test |
| Frank | frank-king@xyz.foo |
test |
| Lothar | lothar-lammich@xyz.foo |
test |
Four organizations have also been set up by Alice:
| Name | Description |
|---|---|
| Managers | Project Managers of the Personal Data application with full control access. |
| Users | Project Users of the Personal Data application with read control access. |
| Data | Personal Data owners who can read and modify only their own data. |
| Others | Rest of IdM registered users not authorized to access the Personal Data Application. |
One application, with appropriate roles and permissions has also been created:
| Key | Value |
|---|---|
| Client ID | tutorial-dckr-site-0000-xpresswebapp |
| Client Secret | tutorial-dckr-site-0000-clientsecret |
| URL | http://localhost:3000 |
| RedirectURL | http://localhost:3000/login |
Logging into Keyrock using the REST API: Getting admin token
Enter a username and password to enter the application. The default user has the values alice-the-admin@test.com
and test. The following example logs in using the Admin User, if you want to obtain the corresponding tokens for
the other users after their creation, just change the proper name and password data in this request:
1 Request
http POST http://localhost:3005/v1/auth/tokens \
  name=alice-the-admin@test.com \
  password=test
1 Response
The response header returns an X-Subject-Token which identifies who has logged on the application. This token is
required in all subsequent requests to gain access
HTTP/1.1 201 Created
Cache-Control: no-cache, private, no-store, must-revalidate, max-stale=0, post-check=0, pre-check=0
Connection: keep-alive
Content-Length: 138
Content-Security-Policy: default-src 'self' img-src 'self' data:;script-src 'self' 'unsafe-inline'; ...
Content-Type: application/json; charset=utf-8
Date: Wed, 10 Feb 2021 08:31:27 GMT
ETag: W/"8a-SCtuhPlCxvhqNChN4qFnlyzMINs"
Expect-CT: max-age=0
Referrer-Policy: no-referrer
Set-Cookie: session=eyJyZWRpciI6Ii8ifQ==; path=/; expires=Wed, 10 Feb 2021 09:31:27 GMT; httponly
Set-Cookie: session.sig=80Qc1EoFnglVR7H5hG9_Rad6txc; path=/; expires=Wed, 10 Feb 2021 09:31:27 GMT; httponly
Strict-Transport-Security: max-age=15552000; includeSubDomains
X-Content-Type-Options: nosniff
X-DNS-Prefetch-Control: off
X-Download-Options: noopen
X-Frame-Options: SAMEORIGIN
X-Permitted-Cross-Domain-Policies: none
X-Subject-Token: f66fe9ee-1910-4d3c-9710-79795ca37ac3
X-XSS-Protection: 0
{
    "idm_authorization_config": {
        "authzforce": false,
        "level": "basic"
    },
    "token": {
        "expires_at": "2021-02-10T09:31:27.065Z",
        "methods": [
            "password"
        ]
    }
}
Users management
Creating Users
In this section, we explain how to create the corresponding users, making use of the corresponding Identity Management API.
Note - an eMail server must be configured to send out invites properly, otherwise the invitation may be deleted as spam. For testing purposes, it is easier to update the users table directly:
update user set enabled = 1;
All the CRUD actions for Users require an X-Auth-Token header from a previously logged in administrative user to be
able to read or modify other user accounts. The standard CRUD actions are assigned to the appropriate HTTP verbs (POST,
GET, PATCH and DELETE) under the /v1/users endpoint.
To create a new user, send a POST request to the /v1/users endpoint containing the username, email and password
along with the X-Auth-Token header from a previously logged in administrative user (see the previous section). Additional
users can be added by making repeated POST requests with the proper information following the previous table.
For example to create additional accounts for Bob, the Application Manager, we should execute the following request
Note You can take a look and execute the user-organizations script to create automatically all the users accounts.
2 Request
echo '{
  "user": {
    "username": "Bob",
    "email": "bob-the-appmanager@test.com",
    "password": "test"
  }
}' | http  POST 'http://localhost:3005/v1/users' \
 X-Auth-Token:"$TOKEN"
2 Response
The response contains details about the creation of this account:
{
    "user": {
        "admin": false,
        "date_password": "2021-02-10T14:45:47.950Z",
        "eidas_id": null,
        "email": "bob-the-appmanager@test.com",
        "enabled": true,
        "gravatar": false,
        "id": "9943e0bd-1596-4d9d-a438-cdea1b7ec7bb",
        "image": "default",
        "salt": "9b5c3d5bbcf649d2",
        "starters_tour_ended": false,
        "username": "Bob"
    }
}
List all Users
Obtaining a complete list of all users is a super-admin permission requiring the X-Auth-Token - most users will only
be permitted to return users within their own organization. Listing users can be done by making a GET request to the
/v1/users endpoint
3 Request
http GET 'http://localhost:3005/v1/users' \
 X-Auth-Token:"$TOKEN"
3 Response
The response contains basic details of all accounts:
{
    "users": [
        {
            "date_password": "2021-02-10T15:16:51.000Z",
            "description": null,
            "email": "eve@example.com",
            "enabled": true,
            "gravatar": false,
            "id": "24ab4550-cb7c-45ce-97ea-870051181745",
            "scope": [],
            "username": "Eve",
            "website": null
        },
        {
            "date_password": "2021-02-10T15:16:52.000Z",
            "description": null,
            "email": "torsten-kuehl@xyz.foo",
            "enabled": true,
            "gravatar": false,
            "id": "2548f3a8-aa5c-4dac-90d5-2442d23cd744",
            "scope": [],
            "username": "Torsten",
            "website": null
        },

      etc...

    ]
}
Grouping User Accounts under Organizations
For any identity management system of a reasonable size, it is useful to be able to assign roles to groups of users, rather than setting them up individually. Since users' administration is a time-consuming business, it is also necessary to be able to delegate the responsibility of managing these group of users down to other accounts with a lower level of access.
Consider our Personal Data management example, there is a group of users, Application Managers, who can introduce new Personal Data into the system as well as modify existing data introduced previously. Another group of users, Application Users, who need to access the Personal Data information to produce some report based on them but cannot modify them. Another group of users, Data Users, correspond to each of the persons that provide the Personal Data, therefore they can access for reading and modifying their only own data. Finally, there is another group of users, Others, exist that are not related to this application and therefore they cannot access to the Personal Data for neither reading nor writing. Rather than give access to each individual account, it would be easier to assign the rights to an organization and then add users to these organizations.
Furthermore, Alice, the Identity Management administrator does not need to explicitly add additional user accounts to each organization herself - she could delegate that right to an owner within each organization. For example Bob, the Project Manager, would be made the owner of the Application Managers organization and could add and remove addition manager accounts to that organization whereas Charlie the Head of Application Users could be handed an ownership role his organization and add additional application users to that organization.
Note that Bob has no permissions to alter the membership list of the Users organization and Charlie has no permissions to alter the membership list of the Managers organization. Furthermore, neither Bob nor Charlie would be able to alter the permissions of the application themselves, merely add and remove existing user accounts to the organization they control.
By the execution of this tutorial, Alice will be the person in charge of the creation of all organizations for management purposes. Therefore, Alice will be automatically assigned to all of these groups.
Create an Organization
The standard CRUD actions are assigned to the appropriate HTTP verbs (POST, GET, PATCH and DELETE) under
the /v1/organizations endpoint. To create a new organization, send a POST request to the /v1/organizations
endpoint containing the name and description along with the X-Auth-Token header from a previously
logged-in user.
Note You can take a look and execute the organization-mgmt script to automatically create all organizations and assign the users to each organization.
4 Request
printf '{
  "organization": {
    "name": "Managers",
    "description": "This group is for the Project Managers of the Personal Data application with full control access"
  }
}'| http  POST http://localhost:3005/v1/organizations \
 Content-Type:'application/json' \
 X-Auth-Token:"$TOKEN"
The Organization is created, and the user who created it is automatically assigned as owner. The response returns a Universally Unique Identifier (UUID), represented by `id field, to identify the new organization.
4 Response
{
    "organization": {
        "description": "This group is for the Project Managers of the Personal Data application with full control access",
        "id": "e3980d68-4f0e-4f7b-b1d5-d3bbc7125fb1",
        "image": "default",
        "name": "Managers"
    }
}
List all Organizations
Obtaining a complete list of all organizations is a super-admin permission requiring the X-Auth-Token - most users
will only be permitted to return users' information within their own organization. Listing users can be done by
making a GET request to the /v1/organizations endpoint.
5 Request
http GET http://localhost:3005/v1/organizations \
 X-Auth-Token:"$TOKEN"
5 Response
The response returns the details of the visible organizations.
{
    "organizations": [
        {
            "Organization": {
                "description": "Personal Data owners who can read and modify only their own data",
                "id": "1d157e87-32e3-4812-bde2-c0d1e3967170",
                "image": "default",
                "name": "Data",
                "website": null
            },
            "role": "owner"
        },
        {
            "Organization": {
                "description": "Project Users of the Personal Data application with read control access",
                "id": "531f0f5c-a7c4-4826-96b2-31988caefc11",
                "image": "default",
                "name": "Users",
                "website": null
            },
            "role": "owner"
        },
        {
            "Organization": {
                "description": "Rest of IdM registered users not authorized to access the Personal Data Application",
                "id": "df58f9d2-443a-4375-abf7-00a88677e7b5",
                "image": "default",
                "name": "Others",
                "website": null
            },
            "role": "owner"
        },
        {
            "Organization": {
                "description": "Project Managers of the Personal Data application with full control access",
                "id": "e3980d68-4f0e-4f7b-b1d5-d3bbc7125fb1",
                "image": "default",
                "name": "Managers",
                "website": null
            },
            "role": "owner"
        }
    ]
}
Assign users to organizations
Users within an Organization are assigned to one of types - owner or member. The members of an organization inherit
all the roles and permissions assigned to the organization itself. In addition, owners of an organization are able to
add and remove other members and owners.
To add a user as a member of an organization, an owner must make a PUT request as shown, including the
<organization-id> and <user-id> in the URL path and identifying themselves using an X-Auth-Token in the header.
6 Request
http  PUT "http://localhost:3005/v1/organizations/$MANAGERS/users/$BOB/organization_roles/member" \
 Content-Type:'application/json' \
 X-Auth-Token:"$TOKEN"
We have to repeat this operation for all the users created previously.
Note: $MANAGERS corresponds to the organization id of the Managers' organization and $BOB corresponds to the user id of the Bob user. See the users-organizations script for more details
6 Response
The response lists the user's current role within the organization (i.e. member)
{
    "user_organization_assignments": {
        "role": "member",
        "organization_id": "18deea43-e12a-4018-a45a-664c3158780d",
        "user_id": "5e482345-2c48-410e-ae03-203d67a43cea"
    }
}
List Users within an Organization
Listing users within an organization is an owner or super-admin permission requiring the X-Auth-Token Listing
users can be done by making a GET request to the /v1/organizations/{{organization-id}}/users endpoint.
7 Request
http GET "http://localhost:3005/v1/organizations/$OTHERS/users" \
 X-Auth-Token:"$TOKEN"
7 Response
The response contains the users list.
{
    "organization_users": [
        {
            "organization_id": "f47a6dfb-bf25-4117-be79-723123f11ec4",
            "role": "owner",
            "user_id": "admin"
        },
        {
            "organization_id": "f47a6dfb-bf25-4117-be79-723123f11ec4",
            "role": "member",
            "user_id": "ff7ff1d6-c34e-4784-a511-dfc86ea6c260"
        },
        {
            "organization_id": "f47a6dfb-bf25-4117-be79-723123f11ec4",
            "role": "member",
            "user_id": "4901190d-7233-4a9c-854a-45551b01d912"
        }
    ]
}
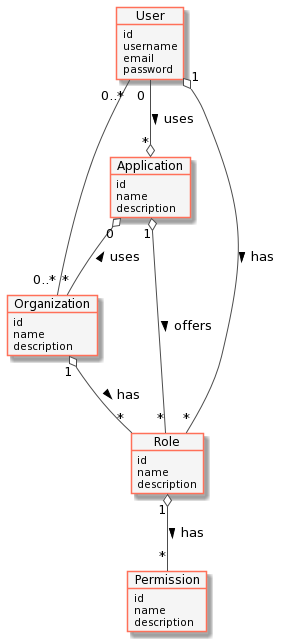
Managing Roles and Permissions
The next step consists in the creation of the proper application, and how to assign roles and permissions to them. It takes the users and organizations created in the previous sections and ensures that only legitimate users will have access to resources.
Authorization is the function of specifying access rights/privileges to resources related to information security. More formally, "to authorize" is to define an access policy. With identity management controlled via the FIWARE Keyrock Generic Enabler, User access is granted based on permissions assigned to a role.
Every application secured by the Keyrock generic enabler can define a set of permissions - i.e. a set of things that can be done within the application. For example within the application, the ability to read and modify new Personal Data . Similarly, the ability to read and modify only your own Personal Data could be secured a proper defined permission.
These permissions are grouped together in a series of roles - for example read and modify Personal Data could both be assigned to the Managers role, meaning that Users who are subsequently given that role would gain both permissions over Personal Data stored in the application. Permissions can overlap and be assigned to multiple roles - maybe read Personal Data is also assigned to the Users role.
In turn users or organizations will be assigned to one of more roles - each user will gain the sum of all the permissions for each role they have. For example if Alice is assigned to both Managers and Users roles, she will gain all permissions for reading and modifying Personal Data.
The concept of a role is unknown to a user - they only know the list of permissions they have been granted, not how the permissions are split up within the application.
In summary, permissions are all the possible actions that can be done to resources within an application, whereas roles are groups of actions which can be done by a type of user of that application. The relationship between the objects can be seen below.
Create an Application
Any FIWARE application can be broken down into a collection of microservices. These microservices connect together to read and alter the state of the real world. Security can be added to these services by restricting actions on these resources down to users how have appropriate permissions. It is therefore necessary to define an application to offer a set of permissible actions and to hold a list of permitted users (or groups of users i.e. an Organization). Therefore, applications are therefore a conceptual bucket holding who can do what on which resource.
To create a new application via the REST API, send a POST request to the /v1/application endpoint containing
details of the application such as name and description, along with OAuth information fields such as the
url of the webservice to be protected, and redirect_uri (where a user will be challenged for their credentials).
The grant_types are chosen from the available list of OAuth2 grant flows. The headers include the X-Auth-Token
from a previously logged-in user will automatically be granted a provider role over the application.
8 Request
In the example below, Alice is creating a new application which accepts three different grant types
printf '{
  "application": {
    "name": "Personal Data Mgmt. Application",
    "description": "FIWARE Application protected by OAuth2 for managing Personal Data",
    "redirect_uri": "http://localhost:1027/login",
    "url": "http://localhost:1027",
    "grant_type": [
      "authorization_code",
      "implicit",
      "password"
    ]
  }
}'| http  POST http://localhost:3005/v1/applications \
 Content-Type:'application/json' \
 X-Auth-Token:"$TOKEN"
8 Response
The response includes a Client ID (id) and Client Secret (secret) which can be used to secure the application.
{
    "application": {
        "description": "FIWARE Application protected by OAuth2 for managing Personal Data",
        "grant_type": "password,authorization_code,implicit",
        "id": "3fc4e897-a9b5-4b2e-bcce-98849c628972",
        "image": "default",
        "jwt_secret": null,
        "name": "Personal Data Mgmt. Application",
        "redirect_uri": "http://localhost:1027/login",
        "response_type": "code,token",
        "scope": null,
        "secret": "a3e10297-7a67-4f41-a5a8-e065332f2bbc",
        "token_types": "bearer",
        "url": "http://localhost:1027"
    }
}
Copy the Application Client ID (id)to be used for all other application requests - in the case above the ID is
3fc4e897-a9b5-4b2e-bcce-98849c628972
export APP=3fc4e897-a9b5-4b2e-bcce-98849c628972
Create a Permission
An application permission is an allowable action on a resource within that application. Each resource is defined
by a URL (e.g. /entities), and the action is any HTTP verb (e.g. GET). The combination will be used to ensure
only permitted users are able to access the /entities resource.
It should be emphasized that permissions are always found bound to an application - abstract permissions do not
exist on their own. The standard permission CRUD actions are assigned to the appropriate HTTP verbs (POST, GET,
PATCH and DELETE) under the /v1/applications/{{application-id}}/permissions endpoint. As you can see the
<application-id> itself is integral to the URL.
Permissions are usually defined once and set-up when the application is created. If the design of your use-case means that you find you need to alter the permissions regularly, then the definition has probably been defined incorrectly or in the wrong layer - complex access control rules should be pushed down into the XACML definitions or moved into the business logic of the application - they should not be dealt with within Keyrock.
To create a new permission via the REST API, send a POST request to the /applications/{{application-id}}/permissions
endpoint containing the action and resource along with the X-Auth-Token header from a previously logged-in
user (Alice).
9 Request
printf '{
  "permission": {
    "name": "Access to a Personal Data entity",
    "action": "GET",
    "resource": "/entities/*",
    "is_regex": true
  }
}' | http  POST "http://localhost:3005/v1/applications/$APP/permissions" \
 Content-Type:'application/json' \
 X-Auth-Token:"$TOKEN"
9 Response
The response returns the details of the newly created permission.
{
    "permission": {
        "action": "GET",
        "id": "6ec726dc-fcad-447b-8222-7b3035de805b",
        "is_internal": false,
        "is_regex": true,
        "name": "Access to a Personal Data entity",
        "oauth_client_id": "3fc4e897-a9b5-4b2e-bcce-98849c628972",
        "resource": "/entities/*"
    }
}
We need to repeat this procedure for the rest of resources from which we want to control the access. In our example we wanted to control the access to the CEF Context Broker instance regarding the creation of entities, creation of several entities. Take a look in the following table to see the different permissions to be created:
| Perm. | Verb | Resource | Description | Organizations |
|---|---|---|---|---|
| #1 | GET | /entities/* | Get information of an entity (all entities) | MANAGERS, USERS |
| #2 | GET | /entities/{{entityID}} | Get information of an entity (one entity) | DATA |
| #3 | POST | /entityOperations/upsert | Add some entities | MANAGERS |
| #4 | PATCH | /entities//attrs/ | Update data associated to an entity (all entities) | MANAGERS |
| #5 | PATCH | /entities/{{ID}}/attrs/* | Update data associated to an entity (one entity) | DATA |
We have to mention that the permission #1 include the permission #2, and the permission #2 in generated after
we have the upload the Personal Data associated to a person (e.g. Ole's Personal Data has the entityID
urn:ngsi-ld:Person:person001).
Note: We should manage all the permissions related to the CEF Context Broker API but for this document we will focus on the previous resources. The script
users-organizationswill create all the corresponding permissions for this example application.
List Permissions
Listing the permissions with an application can be done by making a GET request to the
/v1/applications/{{application-id}}/permissions endpoint
10 Request
http GET "http://localhost:3005/v1/applications/$APP/permissions" \
 X-Auth-Token:"$TOKEN"
10 Response
The complete list of permissions includes any custom permission previously created plus all the standard permissions which are available by default
{
  "permissions": [
    {
      "action": "PATCH",
      "description": null,
      "id": "d7bd7555-e769-4c71-9143-04bdc327cbe0",
      "name": "Permission to Update the Personal Data information associated to an entity (urn:ngsi-ld:Person:person001)",
      "resource": "/entities/urn:ngsi-ld:Person:person001",
      "xml": null
    },
    {
      "action": "GET",
      "description": null,
      "id": "d2cee587-46bf-4233-a455-8f1abb7f7122",
      "name": "Permission to get Personal Data information of an entity (urn:ngsi-ld:Person:person004)",
      "resource": "/entities/urn:ngsi-ld:Person:person004",
      "xml": null
    },
    {
      "action": "PATCH",
      "description": null,
      "id": "ab95d325-e8fe-43bb-b34e-fe5837b14e28",
      "name": "Permission to update the information associated to an entity (all entities)",
      "resource": "/entities/*",
      "xml": null
    },

  etc...

  ]
}
Create a Role
A permission is an allowable action on a resource, as noted above. A role consists of a group of permissions, in other words a series of permitted actions over a group of resources. Roles have a description with a broad scope so that they can be assigned to a wide range of users or organizations for example a Reader role could be able to access but not update a series of devices.
There are two predefined roles with Keyrock :
- a Purchaser who can
- Get and assign all public application roles
- a Provider who can:
- Get and assign public owned roles
- Get and assign all public application roles
- Manage authorizations
- Manage roles
- Manage the application
- Get and assign all internal application roles
Using our Personal Data Example, Alice the admin would be assigned the Provider role, she could then create any additional application-specific roles needed (such as Manager, Users, Data or Others).
Roles are always directly bound to an application - abstract roles do not exist on their own. The standard
CRUD actions are assigned to the appropriate HTTP verbs (POST, GET, PATCH and DELETE) under the
/v1/applications/{{application-id}}/roles endpoint.
To create a new role via the REST API, send a POST request to the /applications/{{application-id}}/roles endpoint
containing the name of the new role, with the X-Auth-Token header from a previously logged-in user.
:eleven: Request
printf '{
  "role": {
    "name": "Manager"
  }
}'| http  POST "http://localhost:3005/v1/applications/$APP/roles" \
 X-Auth-Token:"$TOKEN"
:eleven: Response
The details of the created role are returned
{
    "role": {
        "id": "e5aa8b37-701c-4baf-96d4-9021396445dd",
        "is_internal": false,
        "name": "Manager",
        "oauth_client_id": "e295e248-096b-4222-8969-ea3c4e92d409"
    }
}
We need to repeat the process for Users, Data or Others, changing the value name in the json payload.
Assigning Permissions to each Role
Having created a set of application permissions, and a series of application roles, the next step is to assign the
relevant permissions to each role - in other words defining Who can do What. To add a permission using the REST
API makes a PUT request as shown, including the <application-id>, <role-id> and <permission-id> in the URL
path and identifying themselves using an X-Auth-Token in the header.
The following table summarize the relationship of each Role with the different Permissions
| Role | Permissions |
|---|---|
| ROLE_MANAGER | #1 (GET:/entities/), #3(POST:/entityOperations/upsert), #4(PATCH:/entities/) |
| ROLE_USER | #1 (GET:/entities/*) |
| ROLE_PERSON(n) | #2 (GET:/entities/{{entityID}}), #5(PATCH:/entities/{{entityID}}) |
| OTHERS | ∅ |
Due to the roles are associated to the application, the Role Others does not have any permission assigned in the application, therefore the users under the Role Others should be rejected.
:twelve: Request
http PUT "http://localhost:3005/v1/applications/$APP/roles/$ROLE_MANAGER/permissions/$PERMID' \
 X-Auth-Token:"$TOKEN"
:twelve: Response
The response returns the permissions for the role:
{
    "role_permission_assignments": {
        "permission_id": "c21983d5-58f9-4bcc-b2b0-f21819080ad0",
        "role_id": "64535f4d-04b6-4688-a9bb-81b8df7c4e2c"
    }
}
Note: Take a look into the applications-management script to see how we associated the different permissions with the corresponding Roles.
List Permissions of a Role
A full list of all permissions assigned to an application role can be retrieved by making a GET request to the
/v1/applications/{{application-id}}/roles/{{role-id}}/permissions endpoint.
13 Request
http GET "http://localhost:3005/v1/applications/$APP/roles/$ROLE_MANAGER/permissions" \
  X-Auth-Token:"$TOKEN"
13 Response
{
    "role_permission_assignments": [
        {
            "action": "GET",
            "description": null,
            "id": "c8f127b2-fabc-420c-93aa-79ef104592d4",
            "is_internal": false,
            "name": "Permission to get Personal Data information of an entity (all entities)",
            "resource": "/entities/*",
            "xml": null
        },
        {
            "action": "POST",
            "description": null,
            "id": "e2f8bd53-0ce5-4179-abaf-66abebb0e582",
            "is_internal": false,
            "name": "Permission to add some entities",
            "resource": "/entityOperations/upsert",
            "xml": null
        },
        {
            "action": "PATCH",
            "description": null,
            "id": "c6e50b77-d34b-40a9-9929-03b1b7ae0886",
            "is_internal": false,
            "name": "Permission to update the information associated to an entity (all entities)",
            "resource": "/entities/*",
            "xml": null
        }
    ]
}
In case of the Roles associated to the Person001, the request would be:
14 Request
http GET "http://localhost:3005/v1/applications/$APP/roles/$ROLE_PERSON001/permissions" \
  X-Auth-Token:"$TOKEN"
14 Response
{
    "role_permission_assignments": [
        {
            "action": "GET",
            "description": null,
            "id": "226b3cd7-37f7-4378-99ae-f19bb50469ca",
            "is_internal": false,
            "name": "Permission to get Personal Data information of an entity (urn:ngsi-ld:Person:person001)",
            "resource": "/entities/urn:ngsi-ld:Person:person001",
            "xml": null
        },
        {
            "action": "PATCH",
            "description": null,
            "id": "14738fe7-78b6-4b71-884e-5fda37bafe19",
            "is_internal": false,
            "name": "Permission to Update the Personal Data information associated to an entity (urn:ngsi-ld:Person:person001)",
            "resource": "/entities/urn:ngsi-ld:Person:person001",
            "xml": null
        }
    ]
}
PEP Proxy
Create a PEP Proxy
By default, the docker-compose is created with default credentials. It is a security issue in production environments,
and it is recommended to create a new PEP Proxy account. To create a new PEP Proxy account within an application,
send a POST request to the /v1/applications/{{application-id}}/pep_proxies endpoint along with the X-Auth-Token
header from a previously logged in administrative user.
Provided there is no previously existing PEP Proxy account associated with the application, a new account will be created with a unique id and password and the values will be returned to the response. The first two data are obtained in the creation of the PEP Proxy, the Application Id is obtained after the creation if you request the PEP Proxy details associated to the application.
The following table summarize the Data that are needed, where you can find them, and which are the configuration parameters in PEP Proxy associated to this value.
| Data | Request response | Configuration parameter |
|---|---|---|
| Pep Proxy Username | pep.proxy.id | PEP_PROXY_USERNAME |
| PEP Proxy Password | pep_proxy.password | PEP_PASSWORD |
| Application Id | pep_proxy.oauth_client_id | PEP_PROXY_APP_ID |
Finally, there is only one credential associated to an application for a PEP Proxy, therefore a subsequent request
produces a 409 Conflict with the message Pep Proxy already registered.
15 Request
http POST "http://localhost:3005/v1/applications/$APP/pep_proxies" \
Content-Type:application/json \
X-Auth-Token:"$TOKEN"
15 Response
{
    "pep_proxy": {
        "id": "pep_proxy_5551b5d3-8293-41cb-b569-5836097224ab",
        "password": "pep_proxy_d7a44050-7c61-4f1e-ae9d-49bb626c41c7"
    }
}
Read PEP Proxy details
Making a GET request to the /v1/applications/{{application-id}}/pep_proxies endpoint will return the details of the
associated PEP Proxy Account. The X-Auth-Token must be supplied in the headers. It is important to see that if you
want to obtain the oauth_client_id, you need to request this information with the API.
16 Request
http GET "http://localhost:3005/v1/applications/$APP/pep_proxies" \
Content-Type:application/json \
X-Auth-Token:"$TOKEN"
16 Response
{
    "pep_proxy": {
        "id": "pep_proxy_5551b5d3-8293-41cb-b569-5836097224ab",
        "oauth_client_id": "6f0d6fa9-888e-4371-b9e8-3863e503d242"
    }
}
Note: To update the PEP Proxy credentials just change the configuration parameters PEP_PROXY_APP_ID, PEP_PASSWORD, and PEP_PROXY_USERNAME in the docker-compose file and launch again the docker-compose. It automatically updates the PEP Proxy container with the new data. For your convenience, the script application-management execute all the process.
Authorizing Application Access
In the end, a user logs into an application, identifies himself and then is granted a list of permissions that the user is able to do. However, it should be emphasized that it is the application, not the user that holds and offers the permissions, and the user is merely associated with an aggregated list of permissions via the role(s) they have been granted.
The application can grant roles to either Users or Organizations - the latter should always be preferred, as it allows the owners of the organization to add new users - delegating the responsibility for user maintenance to a wider group.
For example, imagine the Personal Data Application Management gains another user data. Alice has already created
role called Users and assigned it to the Application Users' team. Charlie is the owner of the Application Users'
team organization, and is able to add the new user1 user to his team. user1 can then inherit all the rights of
his team without further input from Alice.
Granting roles to individual Users should be restricted to special cases - some roles may be very specialized an only contain one member so there is no need to create an organization. This reduced the administrative burden when setting up the application, but any further changes (such as removing access rights when someone leaves) will need to be done by Alice herself - no delegation is possible.
Grant a Role to an Application
A role cannot be granted to an organization unless the role has already been defined within the application itself. A
Role can be granted to either members or owners of an Organization. Using the REST API, the role can be granted
making a PUT request as shown, including the <application-id>, <role-id> and <organization-id> in the URL path
and identifying themselves using an X-Auth-Token in the header.
For your convenience, we show in the following table the corresponding environment variables that we will use to grant the roles to the organizations inside the corresponding Personal Data Application Management
| Application Id | Role Id | Organization Id |
|---|---|---|
| $APP | $ROLE_MANAGER | $MANAGERS |
| $APP | $ROLE_USER | $USERS |
The Data Users, how we saw in the previous section, has concrete roles to access concrete information, therefore, they are not associated to an organization and will be managed as grant a role to a user.
17 Request
This example adds the role to all members of the organization:
http PUT \
"http://localhost:3005/v1/applications/$APP/organizations/$MANAGERS/roles/$ROLE_MANAGER/organization_roles/member" \
Content-Type:application/json \
X-Auth-Token:"$TOKEN"
17 Response
The response lists the role assignment as shown:
{
    "role_organization_assignments": {
        "oauth_client_id": "d89426c3-d3b5-4b4f-a9f2-2f697220141e",
        "organization_id": "a8da6722-5fa9-4231-99b6-d88137124c54",
        "role_id": "d27f1e17-3c58-4370-a25d-03f0d76567e6",
        "role_organization": "member"
    }
}
We need to do the same for $USERS and $ROLE_USER how it was described in the previous table.
Grant a Role to a User
Using the REST API, the role can be granted making a PUT request as shown, including the <application-id>,
<role-id> and <user-id> in the URL path and identifying themselves using an X-Auth-Token in the header.
In our case, the table below shows us the correspondent values.
| Application Id | Role Id | User Id |
|---|---|---|
| $APP | $ROLE_PERSON001 | $OLE |
| $APP | $ROLE_PERSON002 | $TORSTEN |
| $APP | $ROLE_PERSON003 | $FRANK |
| $APP | $ROLE_PERSON004 | $LOTHAR |
18 Request
http PUT "http://localhost:3005/v1/applications/$APP/users/$OLE/roles/$ROLE_PERSON001" \
Content-Type:application/json \
X-Auth-Token:"$TOKEN"
The response will confirm the relationship of all the actors.
18 Response
{
    "role_user_assignments": {
        "oauth_client_id": "d89426c3-d3b5-4b4f-a9f2-2f697220141e",
        "role_id": "39a583b5-63df-4a10-a140-05735b7d2987",
        "user_id": "cf756095-01d7-4d85-9be6-365d4b12f7d9"
    }
}
We have to do the same with the other users and roles how was described in the previous table.
Securing CEF Context Broker
Access to CEF Context Broker without Access Token
Secured Access can be ensured by requiring all requests to the secured service are made indirectly via a PEP Proxy (in
this case the PEP Proxy is found in front of the Context Broker). Requests must include an X-Auth-Token, failure to
present a valid token results in a denial of access.
19 Request
If a request to the PEP Proxy is made without any access token as shown:
http GET 'http://localhost:1027/ngsi-ld/v1/entities/urn:ngsi-ld:Person:person001?options=keyValues' \
 Link:'<https://schema.lab.fiware.org/ld/context>' \
 Content-Type:'application/json'
19 Response
The response is a 401 Unauthorized error code, with the following explanation:
HTTP/1.1 401 Unauthorized
Access-Control-Allow-Headers: origin, content-type, X-Auth-Token, Tenant-ID, Authorization, Fiware-Service, Fiware-ServicePath
Access-Control-Allow-Methods: HEAD, POST, PUT, GET, OPTIONS, DELETE, PATCH
Access-Control-Allow-Origin: *
Connection: keep-alive
Content-Length: 38
Content-Type: text/html; charset=utf-8
Date: Thu, 25 Feb 2021 08:39:51 GMT
ETag: W/"26-6PTqI4/SMmDT0Dk1npz+5GhtqaQ"
WWW-Authenticate: IDM uri = undefined
X-Powered-By: Express

Auth-token not found in request header
How to obtain Access Token
To log in to the application using the user-credentials flow send a POST request to Keyrock using the oauth2/token
endpoint with the grant_type=password. Additionally, the authorization filed is constructed as follows, for example
to log-in as Alice, the Admin:
- The Client ID and Client Secret created in the Keyrock - Identity Management for our application are
combined with a single colon
(:). This means that the Client ID itself cannot contain a colon. - The resulting string is encoded using a variant of Base64. For your convenience you can use the following command line instruction:
bash
  echo -n "<Client ID>:<Client Secret>" | base64
- The authorization method and a space ("Basic ") is then prepended to the encoded string.
20 Request
For example to log-in as Alice the Admin:
http --form POST 'http://localhost:3005/oauth2/token' \
 'username'='alice-the-admin@test.com' \
 'password'='test' \
 'grant_type'='password' \
 Accept:'application/json' \
 Authorization:"Basic $BASE64" \
 Content-Type:'application/x-www-form-urlencoded'
:Note: you can execute the following command to automatically export the value of the TOKEN
bash
export TOKEN=$(http --form POST 'http://localhost:3005/oauth2/token' \
'username'='alice-the-admin@test.com' \
'password'='test' \
'grant_type'='password' \
Accept:'application/json' \
Authorization:"Basic $BASE64" \
Content-Type:'application/x-www-form-urlencoded' | jq -r .access_token)
20 Response
The response returns an access token to identify the user (access_token), the refresh token (refresh_token) used to refresh the expired access token, and the expiration time in seconds (expired_in). Additionally, we obtain the scope of this access token (scope) as well as the type of token (token_type):
{
    "access_token": "25c5f5a1a53984d7322b36a6227f36201399a471",
    "expires_in": 3599,
    "refresh_token": "6527f0b041eb890ea361fdd8db91ce2781f60618",
    "scope": [
        "bearer"
    ],
    "token_type": "bearer"
}
This can also be done by entering the Tutorial Application on http:/localhost and logging in using any of the OAuth2 grants on the page. A successful log-in will return an access token. For the next step, we export a TOKEN variable to keep the information of the oAuth token.
export TOKEN={{access_token}}
Access CEF Context Broker with an Authorization token: Alice user
The standard Authorization: Bearer header can also be used to identity the user, the request from an authorized user
is permitted, and the service behind the PEP Proxy, in this case the CEF Context Broker, will return the data as
expected.
21 Request
http GET http://localhost:1027/ngsi-ld/v1/entities/urn:ngsi-ld:Person:person001?options=keyValues \
 Link:'<https://schema.lab.fiware.org/ld/context>' \
 Authorization:"Bearer $TOKEN"
And the response to this request will be the following:
21 Response
HTTP/1.1 401 Unauthorized
Access-Control-Allow-Headers: origin, content-type, X-Auth-Token, Tenant-ID, Authorization, Fiware-Service, Fiware-ServicePath
Access-Control-Allow-Methods: HEAD, POST, PUT, GET, OPTIONS, DELETE, PATCH
Access-Control-Allow-Origin: *
Connection: keep-alive
Content-Length: 32
Content-Type: text/html; charset=utf-8
Date: Thu, 25 Feb 2021 08:41:06 GMT
ETag: W/"20-MyuDimjuU2vQEHt1V4UkUjtT+Ks"
X-Powered-By: Express

User access-token not authorized
That is the expected response due to Alice is not included in any of the permissions to access the CEF Context Broker instance.
Access CEF Context Broker with an Authorization token: Managers (e.g. Bob)
It is the moment to really test the proper access to our data. The process is to select a user from the Managers group, in this case Bob, and check the different operations that we can do with it. Remind that Managers users are the ones that have full control over the application. They can create new personal data, update the information related to one personal data or get all the personal data stored in the system.
The first step will be to obtain the appropriate security token, to do so, we need to send the credentials of the Bob user to the Keyrock – Identity Management instance to recover the proper access_token.
22 Request
export TOKEN=$(http --form POST 'http://localhost:3005/oauth2/token' \
 'username'='bob-the-appmanager@test.com' \
 'password'='test' \
 'grant_type'='password' \
 Accept:'application/json' \
 Authorization:"Basic $BASE64" \
 Content-Type:'application/x-www-form-urlencoded' | jq -r .access_token)
The next step is to check if we can get the personal data of the person001 using the previous token.
23 Request
http GET http://localhost:1027/ngsi-ld/v1/entities/urn:ngsi-ld:Person:person001?options=keyValues \
 Link:'<https://schema.lab.fiware.org/ld/context>' \
 Authorization:"Bearer $TOKEN"
And the response that we obtain is the following:
23 Response
{
    "@context": "https://schema.lab.fiware.org/ld/context",
    "address": {
        "addressLocality": "Berlin",
        "addressRegion": "Berlin",
        "postalCode": "14199",
        "streetAddress": "Detmolder Str. 10"
    },
    "email": "ole-lahm@xyz.foo",
    "id": "urn:ngsi-ld:Person:person001",
    "name": "Ole Lahm",
    "telephone": "0049 1522 99999999",
    "type": "Person"
}
As it was expected, we can get the personal information associated to that user. Now, we try to obtain the personal information associated to the person002:
24 Request
http GET http://localhost:1027/ngsi-ld/v1/entities/urn:ngsi-ld:Person:person002?options=keyValues \
 Link:'<https://schema.lab.fiware.org/ld/context>' \
 Authorization:"Bearer $TOKEN"
Again, we can obtain the personal data associated to the person002 how it was expected.
24 Response
{
    "@context": "https://schema.lab.fiware.org/ld/context",
    "address": {
        "addressLocality": "Berlin",
        "addressRegion": "Berlin",
        "postalCode": "10997",
        "streetAddress": "Eisenbahnstraße 42/43"
    },
    "email": "torsten-kuehl@xyz.foo",
    "id": "urn:ngsi-ld:Person:person002",
    "name": "Torsten Kühl",
    "telephone": "0049 1533 8888888",
    "type": "Person"
}
The next step consists of seeing if we can change the personal data associated to a user, in this case person002
with this token. In this case, we try to change the telephone number of this user.
25 Request
printf '{
      "type": "Property",
      "value": "0049 2644 99999999"
},'| http PATCH http://localhost:1027/ngsi-ld/v1/entities/urn:ngsi-ld:Person:person002/attrs/telephone \
 Link:'<https://schema.lab.fiware.org/ld/context>' \
 Authorization:"Bearer $TOKEN"
The response is the confirmation of the proper execution of that modification with 204 No Content message.
25 Response
HTTP/1.1 204 No Content
Access-Control-Allow-Headers: origin, content-type, X-Auth-Token, Tenant-ID, Authorization, Fiware-Service, Fiware-ServicePath
Access-Control-Allow-Methods: HEAD, POST, PUT, GET, OPTIONS, DELETE, PATCH
Access-Control-Allow-Origin: *
ETag: W/"0-2jmj7l5rSw0yVb/vlWAYkK/YBwk"
X-Powered-By: Express
connection: close
date: Thu, 25 Feb 2021 22:52:11 GMT
Let's see if we can get the new updated data from the CEF Context Broker instance.
26 Request
http GET http://localhost:1027/ngsi-ld/v1/entities/urn:ngsi-ld:Person:person002?options=keyValues \
 Link:'<https://schema.lab.fiware.org/ld/context>' \
 Authorization:"Bearer $TOKEN"
26 Response
{
    "@context": "https://schema.lab.fiware.org/ld/context",
    "address": {
        "addressLocality": "Berlin",
        "addressRegion": "Berlin",
        "postalCode": "10997",
        "streetAddress": "Eisenbahnstraße 42/43"
    },
    "email": "torsten-kuehl@xyz.foo",
    "id": "urn:ngsi-ld:Person:person002",
    "name": "Torsten Kühl",
    "telephone": "0049 2644 99999999",
    "type": "Person"
}
Finally, check if we can upload a new Personal Data information associated to the person010:
27 Request
printf '[
{
  "id": "urn:ngsi-ld:Person:person010",
  "type": "Person",
  "address": {
    "type": "Property",
    "value": {
      "addressLocality": "Berlin",
      "addressRegion": "Berlin",
      "postalCode": "14199",
      "streetAddress": "Detmolder Str. 10"
    }
  },
  "telephone": {
    "type": "Property",
    "value": "0000"
  },
  "email": {
    "type": "Property",
    "value": "xxx@xyz.foo"
  },
  "name": {
    "type": "Property",
    "value": "Xxx Yyy"
  }
}]' | http POST http://localhost:1027/ngsi-ld/v1/entityOperations/upsert \
  Content-Type:application/json \
  Link:'<https://schema.lab.fiware.org/ld/context>' \
  Authorization:"Bearer $TOKEN"
The response is the confirmation of the proper execution of that modification with 204 No Content message.
27 Response
HTTP/1.1 204 No Content
Access-Control-Allow-Headers: origin, content-type, X-Auth-Token, Tenant-ID, Authorization, Fiware-Service, Fiware-ServicePath
Access-Control-Allow-Methods: HEAD, POST, PUT, GET, OPTIONS, DELETE, PATCH
Access-Control-Allow-Origin: *
ETag: W/"0-2jmj7l5rSw0yVb/vlWAYkK/YBwk"
X-Powered-By: Express
connection: close
date: Mon, 22 Feb 2021 14:44:40 GMT
Now, we check if we can access to the new data:
28 Request
http GET http://localhost:1027/ngsi-ld/v1/entities/urn:ngsi-ld:Person:person010?options=keyValues \
 Link:'<https://schema.lab.fiware.org/ld/context>' \
 Authorization:"Bearer $TOKEN"
28 Response
{
    "@context": "https://schema.lab.fiware.org/ld/context",
    "address": {
        "addressLocality": "Berlin",
        "addressRegion": "Berlin",
        "postalCode": "14199",
        "streetAddress": "Detmolder Str. 10"
    },
    "email": "xxx@xyz.foo",
    "id": "urn:ngsi-ld:Person:person010",
    "name": "Xxx Yyy",
    "telephone": "0000",
    "type": "Person"
}
Therefore, we have tested the operations that were granted to the organizations, Managers, in which the user Bob is registered.
Access CEF Context Broker with an Authorization token: Users (e.g. Charlie)
For reminding, this group includes users that can access to all the data but cannot neither create new data nor modify existing one.
For reminding, the Users group includes users that can access to all the data but cannot neither create new data nor modify existing one. The first step will be to obtain the appropriate security token, associated the user Charlie. We need to send the credentials of the Charlie user to the Keyrock – Identity Management instance to recover the proper `access_token.
29 Request
export TOKEN=$(http --form POST 'http://localhost:3005/oauth2/token' \
 'username'='charlie-the-appuser@test.com' \
 'password'='test' \
 'grant_type'='password' \
 Accept:'application/json' \
 Authorization:"Basic $BASE64" \
 Content-Type:'application/x-www-form-urlencoded' | jq -r .access_token)
The next step is to check if we can get the personal data of the person001 using the previous token.
30 Request
http GET http://localhost:1027/ngsi-ld/v1/entities/urn:ngsi-ld:Person:person001?options=keyValues \
 Link:'<https://schema.lab.fiware.org/ld/context>' \
 Authorization:"Bearer $TOKEN"
And the response that we obtain is the following:
30 Response
{
    "@context": "https://schema.lab.fiware.org/ld/context",
    "address": {
        "addressLocality": "Berlin",
        "addressRegion": "Berlin",
        "postalCode": "14199",
        "streetAddress": "Detmolder Str. 10"
    },
    "email": "ole-lahm@xyz.foo",
    "id": "urn:ngsi-ld:Person:person001",
    "name": "Ole Lahm",
    "telephone": "0049 1522 99999999",
    "type": "Person"
}
As it was expected, we can get the personal information associated to that user. Now, we try to obtain the personal information associated to the `person002:
31 Request
http GET http://localhost:1027/ngsi-ld/v1/entities/urn:ngsi-ld:Person:person002?options=keyValues \
 Link:'<https://schema.lab.fiware.org/ld/context>' \
 Authorization:"Bearer $TOKEN"
Again, how it was expected, we can obtain the personal data associated to the `person002.
31 Response
{
    "@context": "https://schema.lab.fiware.org/ld/context",
    "address": {
        "addressLocality": "Berlin",
        "addressRegion": "Berlin",
        "postalCode": "10997",
        "streetAddress": "Eisenbahnstraße 42/43"
    },
    "email": "torsten-kuehl@xyz.foo",
    "id": "urn:ngsi-ld:Person:person002",
    "name": "Torsten Kühl",
    "telephone": "0049 1533 8888888",
    "type": "Person"
}
The next step consists of seeing if we can change the personal data associated to a user, in this case person002
with this token. In this case, we try to change again the telephone number of this user.
32 Request
The next step consists of seeing if we can change the personal data associated to a user, in this case person002
with this token. In this case, we try to change again the telephone number of this user.
printf '{
    "type": "Property",
    "value": "0049 3755 00000000"
},'| http PATCH http://localhost:1027/ngsi-ld/v1/entities/urn:ngsi-ld:Person:person002/attrs/telephone \
 Link:'<https://schema.lab.fiware.org/ld/context>' \
 Authorization:"Bearer $TOKEN"
How we can see the system response with a 401 Unauthorized message due to the User access token that we used has no permissions to update personal information from the system.
32 Response
HTTP/1.1 401 Unauthorized
Access-Control-Allow-Headers: origin, content-type, X-Auth-Token, Tenant-ID, Authorization, Fiware-Service, Fiware-ServicePath
Access-Control-Allow-Methods: HEAD, POST, PUT, GET, OPTIONS, DELETE, PATCH
Access-Control-Allow-Origin: *
Connection: keep-alive
Content-Length: 32
Content-Type: text/html; charset=utf-8
Date: Thu, 25 Feb 2021 22:59:17 GMT
ETag: W/"20-MyuDimjuU2vQEHt1V4UkUjtT+Ks"
X-Powered-By: Express

User access-token not authorized
Finally, check if we can upload a new Personal Data information:
33 Request
printf '[
{
  "id": "urn:ngsi-ld:Person:person011",
  "type": "Person",
  "address": {
    "type": "Property",
    "value": {
      "addressLocality": "Berlin",
      "addressRegion": "Berlin",
      "postalCode": "14199",
      "streetAddress": "Detmolder Str. 10"
    }
  },
  "telephone": {
    "type": "Property",
    "value": "0000"
  },
  "email": {
    "type": "Property",
    "value": "xxx@xyz.foo"
  },
  "name": {
    "type": "Property",
    "value": "Xxx Yyy"
  }
}]' | http POST http://localhost:1027/ngsi-ld/v1/entityOperations/upsert \
  Content-Type:application/json \
  Link:'<https://schema.lab.fiware.org/ld/context>' \
  Authorization:"Bearer $TOKEN"
We can see that the system response with a 401 Unauthorized message again due to the User access token that we used has no permissions to create new personal data information from the system.
33 Response
HTTP/1.1 401 Unauthorized
Access-Control-Allow-Headers: origin, content-type, X-Auth-Token, Tenant-ID, Authorization, Fiware-Service, Fiware-ServicePath
Access-Control-Allow-Methods: HEAD, POST, PUT, GET, OPTIONS, DELETE, PATCH
Access-Control-Allow-Origin: *
Connection: keep-alive
Content-Length: 32
Content-Type: text/html; charset=utf-8
Date: Mon, 22 Feb 2021 15:00:10 GMT
ETag: W/"20-MyuDimjuU2vQEHt1V4UkUjtT+Ks"
X-Powered-By: Express

User access-token not authorized
Now, we check if we can access to the new data, just to confirm that the previous operation has working properly:
34 Request
http GET http://localhost:1027/ngsi-ld/v1/entities/urn:ngsi-ld:Person:person011?options=keyValues \
 Link:'<https://schema.lab.fiware.org/ld/context>' \
 Authorization:"Bearer $TOKEN"
As it was expected, the system cannot find any personal data associated to the user person011 (404 Not Found).
Therefore, we can confirm that the Personal Data was not created into the CEF Context Broker.
34 Response
HTTP/1.1 404 Not Found

{
    "detail": "urn:ngsi-ld:Person:person011",
    "title": "Entity Not Found",
    "type": "https://uri.etsi.org/ngsi-ld/errors/ResourceNotFound"
}
Therefore, we can confirm that the Personal Data was not created into the CEF Context Broker.
Access CEF Context Broker with an Authorization token: Data owners (e.g. Ole)
The users under this organization only should have permissions to access and modify their own data.
35 Request
export TOKEN=$(http --form POST 'http://localhost:3005/oauth2/token' \
 'username'='ole-lahm@xyz.foo' \
 'password'='test' \
 'grant_type'='password' \
 Accept:'application/json' \
 Authorization:"Basic $BASE64" \
 Content-Type:'application/x-www-form-urlencoded' | jq -r .access_token)
Once that we obtain the security token, let’s see what operations we can do with it. Let’s start with obtain the Personal Data of the `person001.
36 Request
http GET http://localhost:1027/ngsi-ld/v1/entities/urn:ngsi-ld:Person:person001?options=keyValues \
 Link:'<https://schema.lab.fiware.org/ld/context>' \
 Authorization:"Bearer $TOKEN"
36 Response
{
    "@context": "https://schema.lab.fiware.org/ld/context",
    "address": {
        "addressLocality": "Berlin",
        "addressRegion": "Berlin",
        "postalCode": "14199",
        "streetAddress": "Detmolder Str. 10"
    },
    "email": "ole-lahm@xyz.foo",
    "id": "urn:ngsi-ld:Person:person001",
    "name": "Ole Lahm",
    "telephone": "0049 1522 99999999",
    "type": "Person"
}
We see that the person can access to his own information stored in the CEF Context Broker. Let’s see if he can
access to the information related to another person (person002).
37 Request
http GET http://localhost:1027/ngsi-ld/v1/entities/urn:ngsi-ld:Person:person002?options=keyValues \
 Link:'<https://schema.lab.fiware.org/ld/context>' \
 Authorization:"Bearer $TOKEN"
37 Response
HTTP/1.1 401 Unauthorized
Access-Control-Allow-Headers: origin, content-type, X-Auth-Token, Tenant-ID, Authorization, Fiware-Service, Fiware-ServicePath
Access-Control-Allow-Methods: HEAD, POST, PUT, GET, OPTIONS, DELETE, PATCH
Access-Control-Allow-Origin: *
Connection: keep-alive
Content-Length: 32
Content-Type: text/html; charset=utf-8
Date: Mon, 22 Feb 2021 15:02:02 GMT
ETag: W/"20-MyuDimjuU2vQEHt1V4UkUjtT+Ks"
X-Powered-By: Express

User access-token not authorized
As it is expected, the system response with unauthorized access to the personal data corresponding to the person
person002. Now trying to modify some own data (e.g. his telephone number).
38 Request
printf '{
    "type": "Property",
    "value": "0049 2644 99999999"
}'| http PATCH http://localhost:1027/ngsi-ld/v1/entities/urn:ngsi-ld:Person:person001/attrs/telephone \
 Link:'<https://schema.lab.fiware.org/ld/context>' \
 Authorization:"Bearer $TOKEN"
38 Response
HTTP/1.1 204 No Content
Access-Control-Allow-Headers: origin, content-type, X-Auth-Token, Tenant-ID, Authorization, Fiware-Service, Fiware-ServicePath
Access-Control-Allow-Methods: HEAD, POST, PUT, GET, OPTIONS, DELETE, PATCH
Access-Control-Allow-Origin: *
ETag: W/"0-2jmj7l5rSw0yVb/vlWAYkK/YBwk"
X-Powered-By: Express
connection: close
date: Fri, 26 Feb 2021 06:34:22 GMT
We see that the person could modify his personal data in the CEF Context Broker properly. Let’s see if this person can change the corresponding information (e.g. his telephone number) from another person, in this case `person002.
39 Request
printf '{
    "type": "Property",
    "value": "00000"
},'| http PATCH http://localhost:1027/ngsi-ld/v1/entities/urn:ngsi-ld:Person:person002/attrs/telephone \
 Link:'<https://schema.lab.fiware.org/ld/context>' \
 Authorization:"Bearer $TOKEN"
39 Response
HTTP/1.1 401 Unauthorized
Access-Control-Allow-Headers: origin, content-type, X-Auth-Token, Tenant-ID, Authorization, Fiware-Service, Fiware-ServicePath
Access-Control-Allow-Methods: HEAD, POST, PUT, GET, OPTIONS, DELETE, PATCH
Access-Control-Allow-Origin: *
Connection: keep-alive
Content-Length: 32
Content-Type: text/html; charset=utf-8
Date: Thu, 25 Feb 2021 23:02:06 GMT
ETag: W/"20-MyuDimjuU2vQEHt1V4UkUjtT+Ks"
X-Powered-By: Express

User access-token not authorized
We see that the user is unauthorized to modify the data corresponding to other persons in the system, as it is expected. Finally, check if we can upload a new Personal Data information:
40 Request
printf '[
{
  "id": "urn:ngsi-ld:Person:person012",
  "type": "Person",
  "address": {
    "type": "Property",
    "value": {
      "addressLocality": "Berlin",
      "addressRegion": "Berlin",
      "postalCode": "14199",
      "streetAddress": "Detmolder Str. 10"
    }
  },
  "telephone": {
    "type": "Property",
    "value": "0000"
  },
  "email": {
    "type": "Property",
    "value": "xxx@xyz.foo"
  },
  "name": {
    "type": "Property",
    "value": "Xxx Yyy"
  }
}]' | http POST http://localhost:1027/ngsi-ld/v1/entityOperations/upsert \
  Content-Type:application/json \
  Link:'<https://schema.lab.fiware.org/ld/context>' \
  Authorization:"Bearer $TOKEN"
40 Response
HTTP/1.1 401 Unauthorized
Access-Control-Allow-Headers: origin, content-type, X-Auth-Token, Tenant-ID, Authorization, Fiware-Service, Fiware-ServicePath
Access-Control-Allow-Methods: HEAD, POST, PUT, GET, OPTIONS, DELETE, PATCH
Access-Control-Allow-Origin: *
Connection: keep-alive
Content-Length: 32
Content-Type: text/html; charset=utf-8
Date: Mon, 22 Feb 2021 15:03:01 GMT
ETag: W/"20-MyuDimjuU2vQEHt1V4UkUjtT+Ks"
X-Powered-By: Express

User access-token not authorized
As expected response, the user cannot create new personal data inside the CEF Context Broker because he has no permissions to do this operation. Now, we check if we can access to the new data:
41 Request
Now, we check if we can access to the new data:
http GET http://localhost:1027/ngsi-ld/v1/entities/urn:ngsi-ld:Person:person012?options=keyValues \
 Link:'<https://schema.lab.fiware.org/ld/context>' \
 Authorization:"Bearer $TOKEN"
41 Response
HTTP/1.1 401 Unauthorized
Access-Control-Allow-Headers: origin, content-type, X-Auth-Token, Tenant-ID, Authorization, Fiware-Service, Fiware-ServicePath
Access-Control-Allow-Methods: HEAD, POST, PUT, GET, OPTIONS, DELETE, PATCH
Access-Control-Allow-Origin: *
Connection: keep-alive
Content-Length: 32
Content-Type: text/html; charset=utf-8
Date: Mon, 22 Feb 2021 15:03:30 GMT
ETag: W/"20-MyuDimjuU2vQEHt1V4UkUjtT+Ks"
X-Powered-By: Express

User access-token not authorized
We can see that the system responses with unauthorized access before not found data.
Access CEF Context Broker with an Authorization token: Other users (e.g. Eve)
Let’s see now the different operations launched by an external users. Remind that Eve is a user registered in
the system, but she has no permissions to manage the personal data stored in the CEF Context Broker. Therefore, we
need to send the credentials of the Eve user to the Keyrock – Identity Management instance to recover the proper
access_tken.
42 Request
export TOKEN=$(http --form POST 'http://localhost:3005/oauth2/token' \
 'username'='eve@example.com' \
 'password'='test' \
 'grant_type'='password' \
 Accept:'application/json' \
 Authorization:"Basic $BASE64" \
 Content-Type:'application/x-www-form-urlencoded' | jq -r .access_token)
Once that we obtain the access token, let’s see what operations we can do with it. Let’s start with obtain the Personal Data of the person001.
43 Request
http GET http://localhost:1027/ngsi-ld/v1/entities/urn:ngsi-ld:Person:person001?options=keyValues \
 Link:'<https://schema.lab.fiware.org/ld/context>' \
 Authorization:"Bearer $TOKEN"
43 Response
HTTP/1.1 401 Unauthorized
Access-Control-Allow-Headers: origin, content-type, X-Auth-Token, Tenant-ID, Authorization, Fiware-Service, Fiware-ServicePath
Access-Control-Allow-Methods: HEAD, POST, PUT, GET, OPTIONS, DELETE, PATCH
Access-Control-Allow-Origin: *
Connection: keep-alive
Content-Length: 32
Content-Type: text/html; charset=utf-8
Date: Mon, 22 Feb 2021 15:04:09 GMT
ETag: W/"20-MyuDimjuU2vQEHt1V4UkUjtT+Ks"
X-Powered-By: Express

User access-token not authorized
As it was expected, we have no permissions, 401 Unauthorized, to get personal information. Now, we try to access the personal data associated to the user `person002.
44 Request
http GET http://localhost:1027/ngsi-ld/v1/entities/urn:ngsi-ld:Person:person002?options=keyValues \
 Link:'<https://schema.lab.fiware.org/ld/context>' \
 Authorization:"Bearer $TOKEN"
44 Response
HTTP/1.1 401 Unauthorized
Access-Control-Allow-Headers: origin, content-type, X-Auth-Token, Tenant-ID, Authorization, Fiware-Service, Fiware-ServicePath
Access-Control-Allow-Methods: HEAD, POST, PUT, GET, OPTIONS, DELETE, PATCH
Access-Control-Allow-Origin: *
Connection: keep-alive
Content-Length: 32
Content-Type: text/html; charset=utf-8
Date: Mon, 22 Feb 2021 15:04:28 GMT
ETag: W/"20-MyuDimjuU2vQEHt1V4UkUjtT+Ks"
X-Powered-By: Express

User access-token not authorized
As it was expected, we have no permissions, 401 Unauthorized, to get personal information. Now trying to modify some attributes.
45 Request
printf '{
    "type": "Property",
    "value": "0049 2644 99999999"
}'| http PATCH http://localhost:1027/ngsi-ld/v1/entities/urn:ngsi-ld:Person:person002/attrs/telephone \
 Link:'<https://schema.lab.fiware.org/ld/context>' \
 Authorization:"Bearer $TOKEN"
45 Response
HTTP/1.1 401 Unauthorized
Access-Control-Allow-Headers: origin, content-type, X-Auth-Token, Tenant-ID, Authorization, Fiware-Service, Fiware-ServicePath
Access-Control-Allow-Methods: HEAD, POST, PUT, GET, OPTIONS, DELETE, PATCH
Access-Control-Allow-Origin: *
Connection: keep-alive
Content-Length: 32
Content-Type: text/html; charset=utf-8
Date: Mon, 22 Feb 2021 15:04:47 GMT
ETag: W/"20-MyuDimjuU2vQEHt1V4UkUjtT+Ks"
X-Powered-By: Express

User access-token not authorized
We see that the request produces again a 401 Unauthorized message as it was expected. Finally, check if we can upload a new Personal Data information:
46 Request
printf '[
{
  "id": "urn:ngsi-ld:Person:person014",
  "type": "Person",
  "address": {
    "type": "Property",
    "value": {
      "addressLocality": "Berlin",
      "addressRegion": "Berlin",
      "postalCode": "14199",
      "streetAddress": "Detmolder Str. 10"
    }
  },
  "telephone": {
    "type": "Property",
    "value": "0000"
  },
  "email": {
    "type": "Property",
    "value": "xxx@xyz.foo"
  },
  "name": {
    "type": "Property",
    "value": "Xxx Yyy"
  }
}]' | http POST http://localhost:1027/ngsi-ld/v1/entityOperations/upsert \
  Content-Type:application/json \
  Link:'<https://schema.lab.fiware.org/ld/context>' \
  Authorization:"Bearer $TOKEN"
46 Response
HTTP/1.1 401 Unauthorized
Access-Control-Allow-Headers: origin, content-type, X-Auth-Token, Tenant-ID, Authorization, Fiware-Service, Fiware-ServicePath
Access-Control-Allow-Methods: HEAD, POST, PUT, GET, OPTIONS, DELETE, PATCH
Access-Control-Allow-Origin: *
Connection: keep-alive
Content-Length: 32
Content-Type: text/html; charset=utf-8
Date: Mon, 22 Feb 2021 15:05:18 GMT
ETag: W/"20-MyuDimjuU2vQEHt1V4UkUjtT+Ks"
X-Powered-By: Express

User access-token not authorized
And the response is again a 401 Unauthorized. Now, we check if we can access to the new data:
47 Request
http GET http://localhost:1027/ngsi-ld/v1/entities/urn:ngsi-ld:Person:person014?options=keyValues \
 Link:'<https://schema.lab.fiware.org/ld/context>' \
 Authorization:"Bearer $TOKEN"
47 Response
HTTP/1.1 401 Unauthorized
Access-Control-Allow-Headers: origin, content-type, X-Auth-Token, Tenant-ID, Authorization, Fiware-Service, Fiware-ServicePath
Access-Control-Allow-Methods: HEAD, POST, PUT, GET, OPTIONS, DELETE, PATCH
Access-Control-Allow-Origin: *
Connection: keep-alive
Content-Length: 32
Content-Type: text/html; charset=utf-8
Date: Mon, 22 Feb 2021 15:05:44 GMT
ETag: W/"20-MyuDimjuU2vQEHt1V4UkUjtT+Ks"
X-Powered-By: Express

User access-token not authorized
We can see that the response is 401 Unauthorized, how it was expected.
Integration with eIDAS
Secure electronic identification (eID) is one of the key enablers of data protection, privacy and the prevention of online fraud, especially in new areas of application, like Smart Cities, where incorporating real identities into trustable infrastructures has a huge potential.
eID can guarantee the unambiguous identification of a person and make it possible to get the service delivered to the person who is really entitled to it. The Electronic Identification, Authentication and Trust Services (eIDAS) Regulation provides a solution to European Member States for recognizing and accepting eIDs issued in other Member States.
Technical specifications and reference implementations of the interoperability nodes for the eID mechanisms were published as open source on 26th November 2015 for the technological infrastructure under Connecting Europe Facility (CEF) program.
The FIWARE identity - eIDAS authentication module that this GE offers allows CEF eID transnational authentication of EU citizens by means of their national eID in FIWARE based OAuth2 authentication domains. Thus, every service deployed according FIWARE security basis, is now accessible by european citizens using their eID and transparently for service providers.
Architecture of the integration
The FIWARE identity - eIDAS authentication module allows users with valid eIDAS accounts (provided by its national eID) to directly login in the IdM and obtain an OAuth2.0 access tokens that represent them in terms of authorization. For enabling this, the service has to be registered in both IdM and eIDAS node. The service is registered in the IdM as a regular Application, including some extra configuration parameters as explained in the next section.
On the other hand, the service has to be registered in the eIDAS node as a Service Provider following the procedure of the specific Member State. Then, when the user is going to authenticate in the IdM it will have the option of selecting a kind of “Login with eID” option that will redirect it to the specific authentication gateway. Then, the IdM and the eIDAS node will interchange the needed SAML requests to finally obtain the user eIDAS profile. With this profile, the IdM will create a local user mapping the received attributes with the local ones and creating an authorization code. This code will be sent to the Service. Finally, the Service requests the Access Token to allow the OAuth2.0 flows.
Once the service has the Access Token, it can use it as always to authorize requests to other services. Furthermore, as the user is created in the IdM, permissions and roles could be managed in the same way as a regular local user, how it was explained in the previous sections of this documentation. Next figures show the architecture and data flows between the entities.
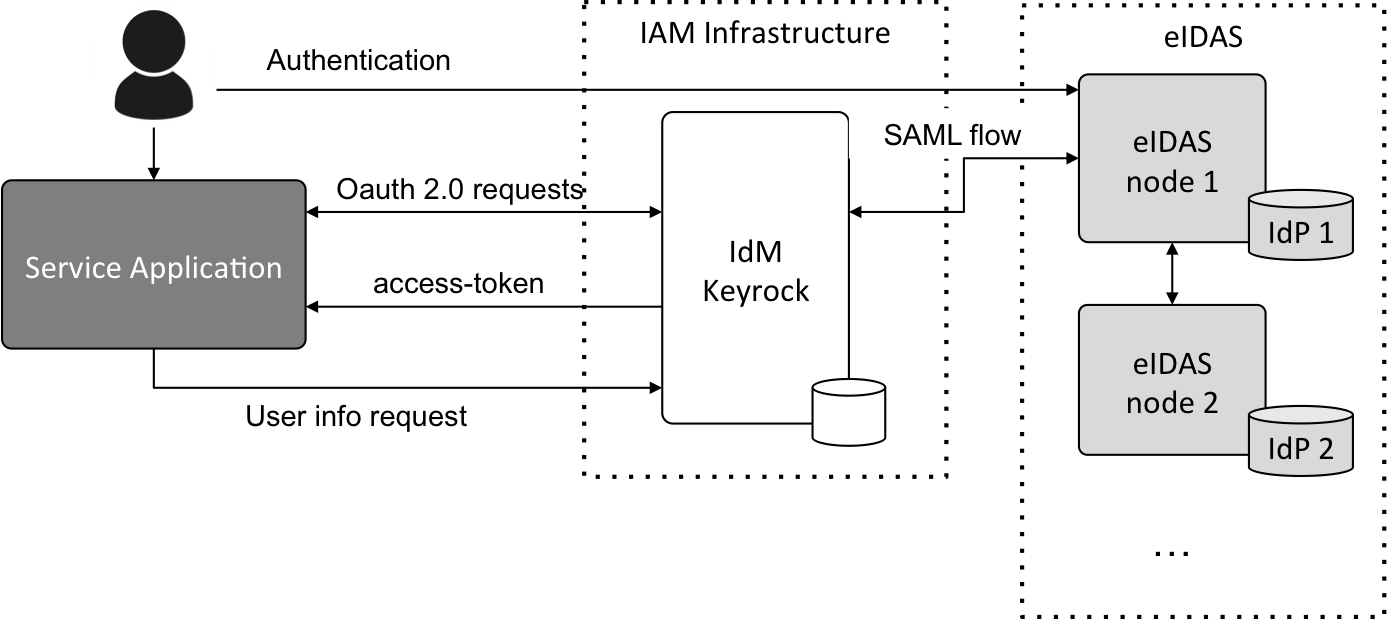
IdM server configuration
For configuring IdM to allow users to login with their eID, the connection to an eIDAS node has to be enabled in the configuration file:
config.eidas = {
    enabled: true,
    gateway_host: 'localhost',
    node_host: 'https://eidas.node.es/EidasNode',
    metadata_expiration: 60 * 60 * 24 * 365 // One year
};
Or using the environment variables in the deployment of the corresponding instance:
IDM_EIDAS_ENABLED=true                               # Enable IdM to allow user authentication in services using their
                                                     # eID (true,false)
IDM_EIDAS_GATEWAY_HOST=localhost                     # Name of the host in which IdM is running
IDM_EIDAS_NODE_HOST=https://eidas.node.es/EidasNode  # Name of the host in which is running node eIDAS Service
IDM_EIDAS_METADATA_LIFETIME=31536000                 # Lifetime of metadata of a service with eIDAS authentication
                                                     # enabled in seconds (1 year)
The meaning of the attributes is the following:
- enabled: set to true enables the connection to the eIDAS node.
- gateway_host: indicates the DNS of the IdM service.
- node_host: indicates the endpoint where the eIDAS node server is running.
- metadata_expiration: expiration time for the service certificates.
Registering an application as an eIDAS Service Provider
Once the IdM has be configured to support eID authentication, registered applications can enable this kind of authentication individually. During the registration process a new checkbox is included as seen in the following image:
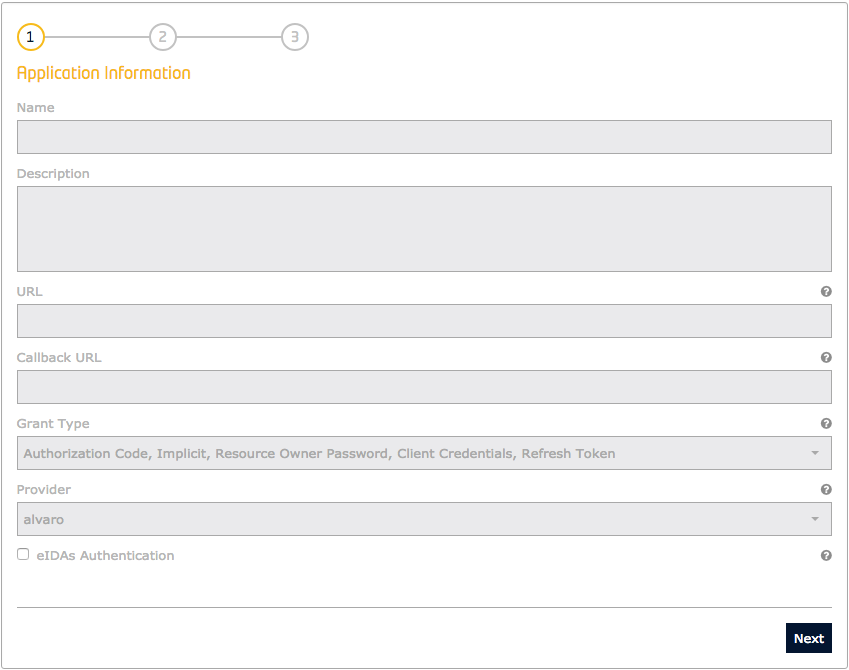
Then, a new step in the registration process is included. In this new step the data regarding the Service Provider registered in the eIDAS node has to be filled.
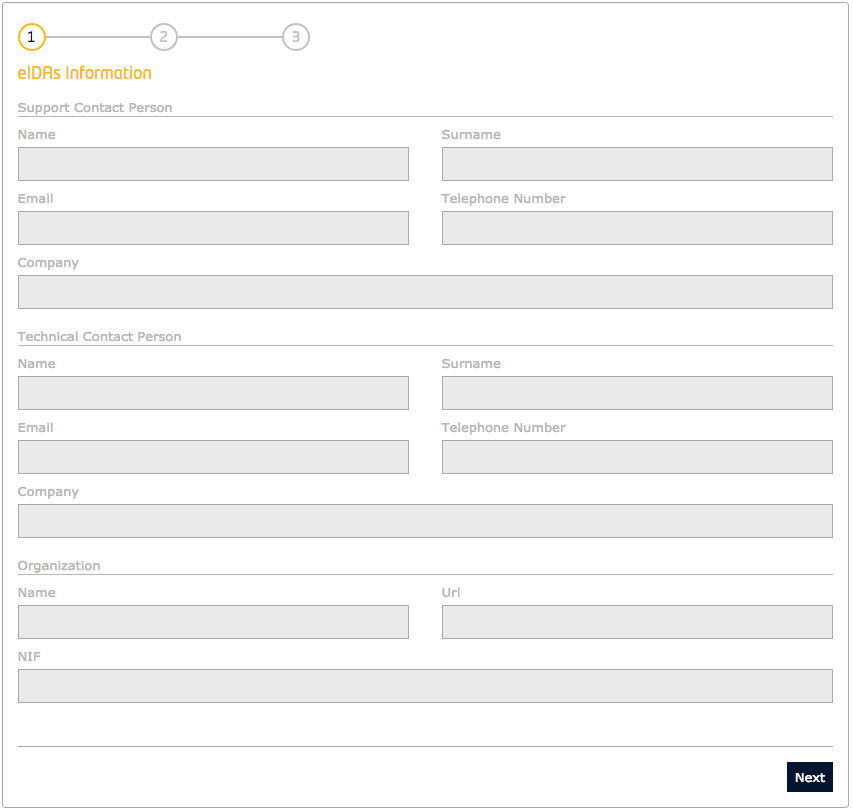
Once the application is registered, the metadata of the Service Provider is exposed in the endpoint
/applications/{{application-id}}/saml2/metadata. This metadata file is needed for registering
the Service Provider in the eIDAS node.
:Note: It is very important to register the Service Provider in the eIDAS node following the specific instructions of the node owner. These instructions depend on the Member State where the node is deployed. Testing nodes can be deployed following the instructions provided by the EC.
User authentication
When a user is going to authenticate in an application with eIDAS connection enabled, a new button that allows authentication with eID is included in the log in the panel:
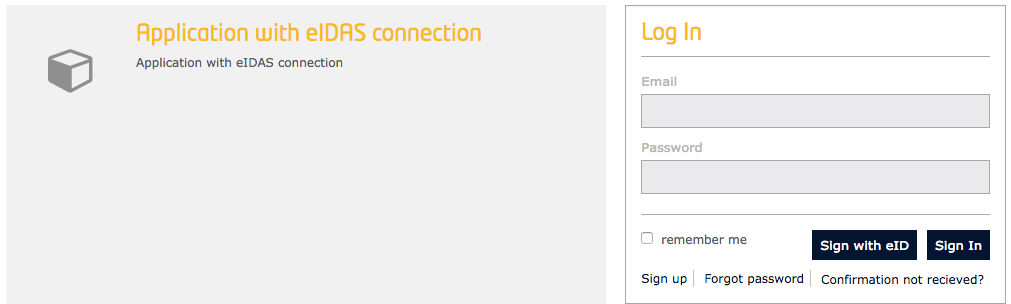
When clicking in the option Sign with eID the user will be redirected to the eIDAS authentication gateway to login
using his/her national identifier and defined in the node_host attribute in the configuration file or with the
corresponding environment variable IDM_EIDAS_NODE_HOST. For instance, the Spanish gateway has the following
interface:
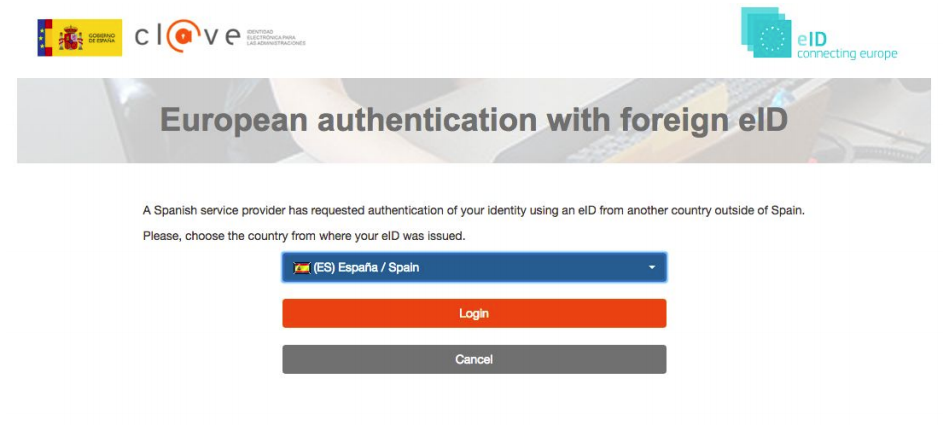
If the users select the option for authenticating European citizens, they are redirected to a new view in which, selecting the specific country, they can authenticate using their national identifier:
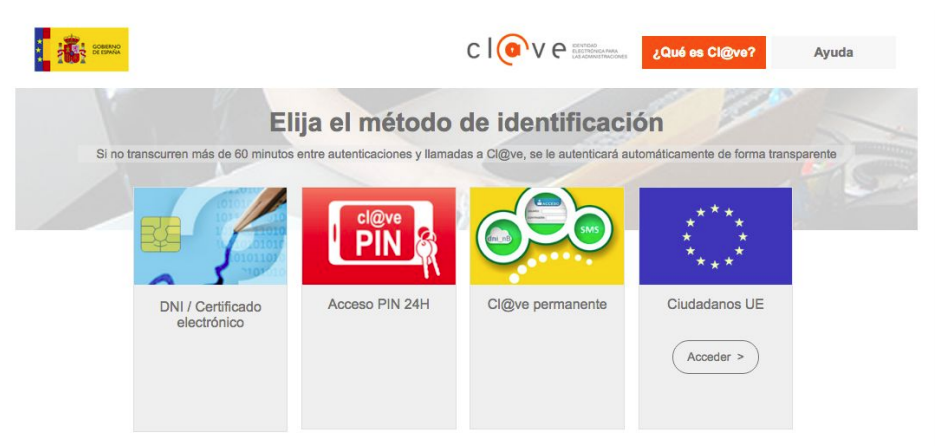
Once the authentication is performed, the eIDAS node sends de SAML response back to the IdM. Then, IdM extracts the user information from the response and proceeds with the creation of a local user for the first iteration. Once the local user is created, Keyrock generates an OAuth 2.0 access token as for a regular user. Thus, the eIDAS user has the same rights and features than every user registered in Keyrock. The user data is included in the token validation information when it is checked, for instance, from a PEP Proxy.
The next time the user wants to authenticate using eIDAS the process is the same one. However, after the eIDAS authentication, IdM detects the user has been already created in its database, and it does simply create the token without performing the user creation.
License
MIT © 2021 FIWARE Foundation e.V.